Check out this post — Expense Report: Pre-Trip Costs — for a better understanding of other costs associated with a RTW trip, as well as a definition of my travel style and how it impacts my budget.
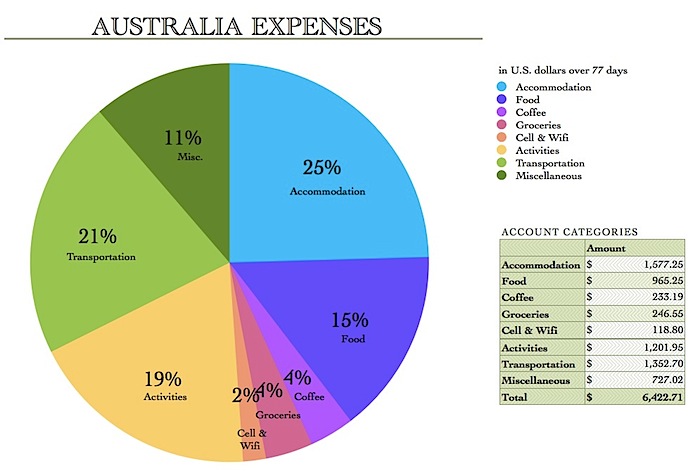
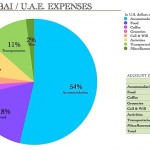
Just as I did in the Cook Islands and New Zealand, I have diligently recorded every dime I’ve spent in Australia. I added up the numbers for my 77 nights in Oz and here’s how it breaks down in US dollars:
- Accommodation = $1,577.25 … $20.48 per night *
- Food = $965.25 … $12.53 per day
- Coffee = $233.19 … $3.02 per day
- Groceries = $246.55 … $3.20 per day
- Cell & Wifi = $118.80 … $1.54 per day
- Activities = $1,201.95 … $15.60 per day
- Transportation = $1,352.70 … $17.56 per day
- Miscellaneous = $727.02 … $9.44 per day
* I only paid for 59 nights of accommodation, since I spent 18 nights either WWOOFing or camping in the Outback & Fraser Island as part of a tour. So while $20.48 is my nightly average over all 77 nights, just be aware that the typical hostel is more like $26 USD per night.
And the grand total for 77 nights in Australia is…
$6,422.71 USD, which works out to $83.37 per day.
I’m trying not to FREAK OUT about those numbers. I had an absolute blast in Australia and wouldn’t trade those 2.5 months for anything.
To my best guess, my monthly costs in Los Angeles (rent, food, gas, car insurance, coffee, cell service, etc.) total around $1,700. So during a similar period of 2.5 months in L.A., I’d spend around $4,250… compared to $6,422 doing so many awesome things in Australia. Thinking about it in those terms makes me feel better. Granted, I normally have an income in L.A., but let’s not concentrate on that right now.
Here’s how the numbers break down on a shiny circle graph:
And here’s how those numbers compare with the the Cook Islands and New Zealand:
- My daily average spent in Cook Islands: $157.05
- My daily average spent in New Zealand: $88.56
- My daily average spent in Australia: $83.37
So I managed to shave $5 off my daily average since my last country. I’ll take it.
A handful of things to note:
- I used xe.com in early August to calculate the exchange rate between the Australian Dollar (AUS) and the U.S. Dollar (USD). At that point in time, 1 AUS = .90 USD.
- I did not include my flight into the country (Auckland to Melbourne for $217 USD) or out of the country (Perth to Singapore for $235 USD) because at the end of my RTW trip I will tally up all one-way international flights and share that total in a final budget post. I’m keeping them separate since international travel is inherent to any RTW itinerary and it doesn’t seem relevant to tack them onto each country budget and bring up the daily average. I will, however, include any domestic flights in each country breakdown. In the case of Australia, the following flights are all accounted for under the transportation section (which is why it’s so high): Adelaide to Alice Springs, Alice Springs to Sydney, Sydney to Tasmania and back, Sydney to Byron Bay, and Cairns to Perth.
- Some miscellaneous purchases include: the Australian tourist visa ($20 AUS), multiple theater tickets ($152 AUS total), the cost to ship a box of books I couldn’t bear to part with back to the U.S. ($36 AUS), and a new Canon D20 underwater camera ($250 AUS)… more on that below.
- The miscellaneous category is quite high ($9.44 per day) because my Canon D10 underwater camera bit the dust in the Whitsundays and I had to purchase a new Canon D20 in Cairns. I’m including it here (instead of noting it separately) because on any trip of this duration something is bound to go wrong with with your gear (electronic or otherwise), so this is not an altogether unexpected expense. If it wasn’t the camera it could have easily been something else, so I’ve included it under the miscellaneous category.
- In Australia I used an Amaysim SIM card, which is incredibly cheap and has great coverage throughout Oz. The SIM card costs $2 and can be activated on-line. Data is only $20 AUS for 2.5 GB per month. I also paid around $20 AUS (over 2.5 months) for calling & texting. There is an app you can use to easily track remaining data, calling, and text allowance — and add more minutes or data with the swipe of a finger. The only downside is that Amaysim doesn’t have a physical location so there is no employee to set up the SIM card for you. I purchased my SIM card at a convenience store but could only find a micro SIM (my iPhone 5 takes a nano SIM) so I bought scissors and delicately cut the card down to size. Not a big deal if I messed up since the card was only $2, but it was a pain. Then I went on-line, activated the SIM card and linked it to my credit card, and downloaded the app on my phone. After about 15 minutes I restarted my phone and everything was working fine. While I was able to figure all of this out on my own, the entire process took several hours and was occasionally frustrating. But it was SO, SO cheap — by far the best deal on the Australian SIM card market. At first I was wary about the coverage, but with the exception of various parts of the Outback & Tasmania, I had coverage everywhere. When I left Oz I cancelled my account by simply sending a text message. Easy peasy. Despite the initial start-up effort, I couldn’t have been happier with this service.
- As I detailed in my New Zealand post, I did not incur any ATM fees thanks to my Charles Schwab debit card (it’s one of the few cards with zero fees for local or international ATM transactions). And I continue to use the Viber app to stay in touch with friends and family while abroad. It’s completely free.
- I did not buy a single souvenir while in Australia. “Leave nothing but footprints, take nothing but photos… KILL NOTHING BUT TIME.”
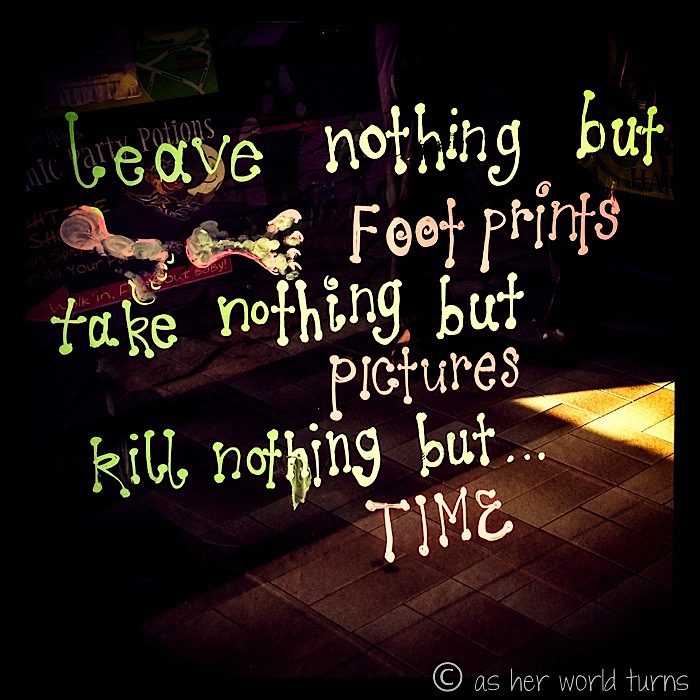
Photo taken in Airlie Beach.
And exactly how much did I save by reaching out to travel companies and exchanging tour experiences for photography and coverage on my blog? I received discounts at Phillip Island ($55), Great Ocean Road & Grampians Tour ($425), Barossa Valley Wine Tour ($90), Kangaroo Island Tour ($445), Outback Tour plus 2 nights hostel accommodation ($377), Blue Mountains Tour ($135), Wineglass Bay Tour ($110, Greyhound Pass ($389), Fraser Island Tour ($399), Mission Beach Skydiving 20% discount & free DVD ($190), Great Barrier Reef 30 minute helicopter flight ($400), scuba diving Open Water certification ($540), Australian Pinnacles Tour 50% discount ($70), Rottnest Ferry return ticket & bike rental ($70). The total amount I saved because of my travel blog is $3,325.50 USD.
SWEET!!!!!!!!!!!

Clearly, my budget would have forced me to skip some of these activities if I hadn’t received a discount (I’m looking at you, awesome helicopter ride of the Great Barrier Reef).
A very important note about the blog discounts: Most of the companies I’ve toured with have sponsored my trips in exchange for photography. Not blog posts. While they are always very complimentary of my blog, the main reason they offer me a tour is because I provide them with images for promotional use on websites, print brochures, and social media. This allows me to travel for much less (usually free) and build my portfolio. The tour companies can update their photos and better market their brand. It’s win-win. I think it’s important to point out this arrangement so it’s clear that I’m not writing ‘praise posts’ in exchange for free trips… these are my own opinions and separate from the photography deal I’ve arranged with various tour companies. But I do my homework before reaching out to them, since I’m looking for a tour that fits with my travel style, and in most cases I end up very much enjoying the trip and happily share the experience here.
That said, a handful of posts were granted only for blog coverage (Phillip Island, Blue Mountains, Wineglass Bay, Mission Beach Skydiving discount, and Australian Pinnacles). The others were all in exchange for photography with the blog posts an added bonus. Either way, all opinions are my own.
I’m tired just typing all that! Congrats on making it to the end of this post. I hope these numbers come in handy if you are planning your own trip to this part of the world.

Very interesting! You did a great job. Bob
Thank you Mr. Wing! I’ve enjoyed tracking the numbers as it’s played out. I look forward to comparing all of these countries at the end of my trip!
So interesting! I love hearing about the ‘nuts and bolts’ that make a RTW trip happen. You are doing an amazing job! Your blog is incredible. You should be so proud!
Thank you Kelley!!! That means a lot coming from a seasoned blogger like you 🙂 I’m glad you like the nuts & bolts posts — those are the most fun for me to write! 🙂